Understanding Skin Preparation
Understanding the right techniques for how to prep skin for self tanner is crucial for achieving a flawless and natural-looking glow. Proper skin preparation not only ensures an even application but also extends the longevity of your tan, preventing streaks and patchiness. By following essential steps like exfoliation, moisturizing, and cleansing, you can create the perfect base for a radiant sun-kissed finish. Preparing your skin is the foundation of a perfect self-tan. Discover the best techniques in this guide on how to prep skin for self tanner and achieve a smooth, radiant glow.
Achieving a beautiful self-tan requires more than just applying the product—it’s about ensuring your skin is in the best possible condition before application. Proper skin prep enhances absorption, prevents uneven fading, and gives your tan a natural, seamless look. Additionally, skin prep isn’t a one-time event; it should be part of your regular skincare routine. When your skin is well-maintained, you’ll find that your tan lasts longer, fades more evenly, and looks healthier.
To optimize your skin for tanning, focus on consistency. Regularly moisturizing, gently exfoliating, and protecting your skin from excessive sun exposure will help create the perfect foundation for a radiant glow.
The Importance of Prepping Skin
Knowing how to prep skin for self tanner is essential to avoid common pitfalls like uneven patches or streaky results. Prepping your skin begins with exfoliation, which removes dead skin cells and smooths the surface. Pay close attention to areas prone to dryness, such as elbows, knees, and ankles. These spots tend to absorb more product, leading to darker patches if not treated properly.
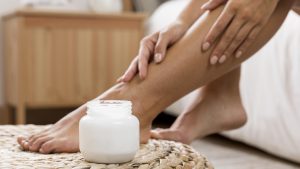
Moisturizing is another critical step. Applying a lightweight moisturizer to dry areas ensures the self-tanner is evenly absorbed. However, avoid heavy or oil-based creams right before application, as they can create a barrier that interferes with the tan.
Additionally, clean, dry skin is key. Before applying self-tanner, make sure your skin is free of oils, lotions, and perfumes. This allows the tanning product to adhere properly, providing a smooth and even glow. For the best results, ensure you follow these preparation steps meticulously.
Another overlooked benefit of proper skin preparation is improved skin texture. Self-tanner tends to highlight imperfections such as dry patches, rough spots, or uneven tone. By prepping correctly, you not only enhance your tan but also improve your skin’s overall appearance. Furthermore, pre-tan preparation minimizes the chances of self-tanner clinging to fine lines and creases. Many people experience dark buildup around knuckles, wrists, and ankles simply because they haven’t properly smoothed out their skin beforehand. A thorough prep routine ensures an even, natural result.
Timing Your Routine
Proper timing is a vital part of how to prep skin for self tanner. Begin your preparation at least 24 hours before applying the tanner. Start by exfoliating your skin to remove dead cells, which helps the tanner adhere evenly. If you plan to shave or wax, do so 24–48 hours in advance to avoid irritation.
Apply moisturizer to dry areas about an hour before tanning. This helps hydrate the skin without creating a barrier. Additionally, allow ample time for the tanner to develop. Most products require at least 6–8 hours to fully set, so plan accordingly to avoid water or sweat during this period.
Proper timing also means avoiding any activities that might interfere with your self-tanner’s development. Avoiding exercise, saunas, and swimming for the first 24 hours ensures your tan sets evenly without disruption.
Additionally, planning your self-tan around your schedule is key. If you have a special event coming up, apply your self-tanner at least two days before to allow for full development and any necessary touch-ups. This prevents last-minute tanning mistakes and ensures the most natural look.
Essential Supplies
Gathering the right supplies is an important step in learning how to prep skin for self tanner. Start with an exfoliating product to remove dead skin. Choose a gentle scrub or a chemical exfoliant containing AHAs or BHAs. An exfoliating mitt can also help achieve smoother results.
Next, have a high-quality moisturizer on hand to target dry areas. Opt for lightweight, oil-free formulations that hydrate without leaving a greasy residue. Lastly, invest in a tanning mitt or applicator to ensure a streak-free application and to keep your hands stain-free. Achieving a flawless tan requires the right preparation.
Another helpful tool to have on hand is a pH-balancing body wash. Using a body wash with a balanced pH level helps maintain your skin’s natural barrier, allowing for a more even tan. Avoid soaps with sulfates or harsh ingredients, as they can strip your skin, making it harder for the tanner to absorb properly.
Consider investing in disposable blending sponges or kabuki brushes for applying self-tanner to tricky areas like your hands, feet, and face. These tools help diffuse excess product and prevent telltale tanning lines.
Exfoliating Effectively
Exfoliation is the cornerstone of how to prep skin for self tanner. By sloughing off dead skin cells, you create a smooth surface for even absorption. Use a body scrub or an exfoliating mitt in the shower, focusing on rough areas like elbows, knees, and ankles. This helps prevent patchy application and ensures a natural-looking tan.
For best results, exfoliate 24 hours before applying self-tanner. Avoid harsh scrubs that may irritate the skin. Instead, opt for gentle exfoliants that suit your skin type. Rinse thoroughly and pat your skin dry to complete this step.
For an even deeper exfoliation, consider dry brushing before your shower. This technique not only removes dead skin cells but also stimulates circulation, giving your skin a natural glow before you even apply self-tanner.
Another effective exfoliation method is using enzyme-based exfoliants. These gentle formulas break down dead skin without the need for physical scrubbing, making them ideal for sensitive skin types.
Be mindful of over-exfoliating. Scrubbing too aggressively or too frequently can cause skin irritation, which may lead to an uneven tan. Stick to gentle, controlled exfoliation to keep your skin smooth without damage.
Moisturizing Before Application
Proper hydration is a key component of how to prep skin for self tanner. Moisturizing helps balance the skin’s hydration levels, reducing the risk of dry patches absorbing too much product. Focus on areas prone to dryness, such as elbows, knees, and ankles, as well as the tops of your feet and hands.
Apply a thin layer of moisturizer at least 30 minutes before using the self-tanner. This allows time for the moisturizer to fully absorb without interfering with the tanning product. Choose a formula that is lightweight and free of heavy oils for the best results.
If you struggle with extremely dry skin, try applying a hydrating serum before your moisturizer. Ingredients like hyaluronic acid and ceramides help lock in moisture and create a supple surface for the self-tanner to develop evenly.
For best results, choose a moisturizer that is oil-free and lightweight. Heavy creams can leave a residue that prevents self-tanner from properly absorbing, leading to streaky or patchy results.
If you’re self-tanning in colder months, be extra mindful of hydration. Winter air tends to dry out the skin faster, which can cause your tan to fade unevenly. Consider applying a rich, overnight moisturizer the night before tanning for extra hydration.
Application Techniques
Knowing how to prep skin for self tanner also involves understanding the best application methods. Use a tanning mitt or glove to ensure even coverage and prevent staining your hands. Apply the product in circular motions, starting from your feet and working your way upward. This helps avoid streaks and ensures smooth application.
For tricky areas like your hands, feet, and face, use the leftover product on the mitt for a lighter, more natural finish. Be sure to blend well around joints and edges to avoid harsh lines. Once applied, allow the self-tanner to dry completely before putting on clothes or coming into contact with water.
Self-tanner application is all about blending and precision. Always take your time when applying, and don’t rush through the process. Even a slight mistake in application can lead to streaks or uneven patches.
To achieve a more natural transition, lightly wipe your wrists, elbows, and ankles with a damp cloth after applying self-tanner. This technique ensures the product doesn’t develop too darkly in areas where the skin naturally creases.
If you’re nervous about applying self-tanner to your face, try mixing a drop of self-tanner with your daily facial moisturizer. This dilutes the product slightly, creating a gradual, buildable tan that looks effortlessly natural.
Post-Application Tips
After applying self-tanner, following the right post-care routine is essential for maintaining your glow. Avoid showering, swimming, or sweating for at least 6–8 hours to let the product develop fully. Once the tan has set, moisturize daily to keep your skin hydrated and prolong the life of your tan.
If you notice any streaks or uneven patches, gently exfoliate the area and reapply a small amount of self-tanner. Regular touch-ups and proper care can help you maintain a radiant, streak-free look. Proper skin prep is the secret to a streak-free, even tan.
While your self-tanner is developing, avoid touching your skin too frequently. Resting your hands on your legs or crossing your arms can cause smudges and uneven patches. If you accidentally get self-tanner on your palms, try using a makeup wipe or micellar water to gently remove excess product before it develops.
To further extend your tan, consider using a tan-extending lotion every other day. These products contain a small amount of DHA (the active ingredient in self-tanners), which helps maintain your glow without requiring a full reapplication.
Common Mistakes to Avoid
When learning how to prep skin for self tanner, it’s important to avoid common mistakes that can affect the final result. Skipping exfoliation or moisturizing can lead to uneven patches and streaks. Applying the product to wet or sweaty skin can also cause the tanner to develop inconsistently.
Additionally, rushing through the application process can result in missed spots or an uneven finish. Take your time to blend the product thoroughly, and always wash your hands after applying self-tanner to prevent staining. By avoiding these mistakes, you can achieve a flawless, sun-kissed glow every time.
Another common mistake is forgetting to tan your ears and neck. These areas are often overlooked, leading to an unnatural contrast between the face and the rest of the body. Use a light hand and blend carefully to ensure even coverage.
Avoid using retinol, AHAs, or BHAs in your skincare routine immediately after self-tanning. These exfoliating ingredients can strip away your tan prematurely, causing uneven fading. When applying self-tanner to problem areas like knees and elbows, use a small amount of translucent setting powder after application. This helps prevent the tanner from gathering in creases and developing too darkly.